Configuring jOAI to support RIF-CS
Overview
jOAI is developed by Digital Learning Sciences (DLS) at the University Corporation for Atmospheric Research. jOAI can be installed on Windows, Linux, Mac OS or UNIX systems. It is a Java-based open source Open Archives Initiative data provider and harvester tool that runs in a servlet container such as Apache Tomcat.
The jOAI data provider allows XML files from a file system to be exposed as items in an OAI data repository and made available for harvesting by others using the OAI-PMH. After pointing the software to one or more file directories, the software monitors the XML files inside, adding, updating or deleting them from the OAI repository as files are added, updated or deleted from the directories.
The jOAI harvester is used to retrieve metadata records from remote OAI data providers and save them to the local file system, one record per file. In addition, records that have been harvested are packaged into zip archives that can be downloaded and opened through the harvester's web-based interface.
jOAI Installation
jOAI system requirements
The jOAI software runs on Windows, Mac, Linux and Unix platforms. The following components are needed to operate the software:
- oai.war - The jOAI software
- Apache Tomcat servlet container, version 5.5.x or 6.x
- Java Standard Edition (SE) version 5 or 6
Download jOAI
jOAI can be downloaded from Sourceforge.
Install jOAI
Four steps are involved:
- Place the file 'oai.war' into the 'webapps' directory: /usr/vtls/vital/applications/fedora/server/jakarta-tomcat-5.0.28/webapps.
- Start or restart Tomcat. Upon startup the first time, Tomcat will automatically unpack the oai.war archive, creating a directory and application context named 'oai'.
- The jOAI software should now be running. Launch a web browser and type in the URL to the oai servlet context:
- For example: https://researchdata.edu.au/registry/services/oai
If there are errors accessing the software try repeating or verifying steps 1 and 2.
Tip: Check the Tomcat logs for error messages located in the 'logs' directory of your Tomcat installation if there are problems.
- For example: https://researchdata.edu.au/registry/services/oai
- At the URL mentioned above, you will be greeted by a 'Getting started' page that will walk through the remaining few steps necessary to use the OAI harvester, data provider or repository search portions of the software.
jOAI Configuration
There are three steps necessary to make metadata files available through the jOAI data provider:
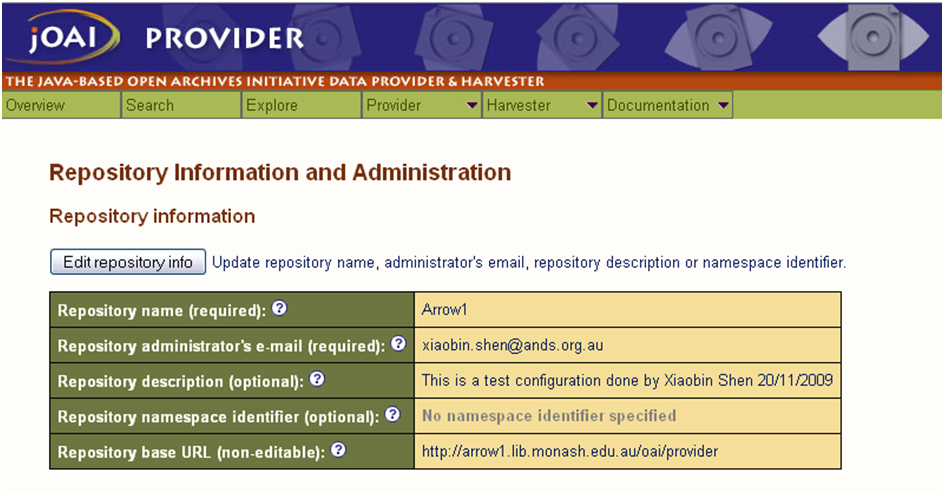
1. Complete the 'Repository Information' by clicking 'Edit repository info' in the Repository Information and Administration page and then:
- Enter a repository name (required)
- Include an administrators e-mail address (required)
- Provide a namespace identifier (optional but strongly recommended)
- Provide a description (optional)
The namespace-identifier is similar to an Internet domain name, for example "dlese.org" or "project.dlese.org." If specified, the namespace identifier is used to compose the OAI Identifier for items in the repository. See the OAI Identifier Format guidelines for more information. Leave the description blank if not using.
See screen-shots for details:

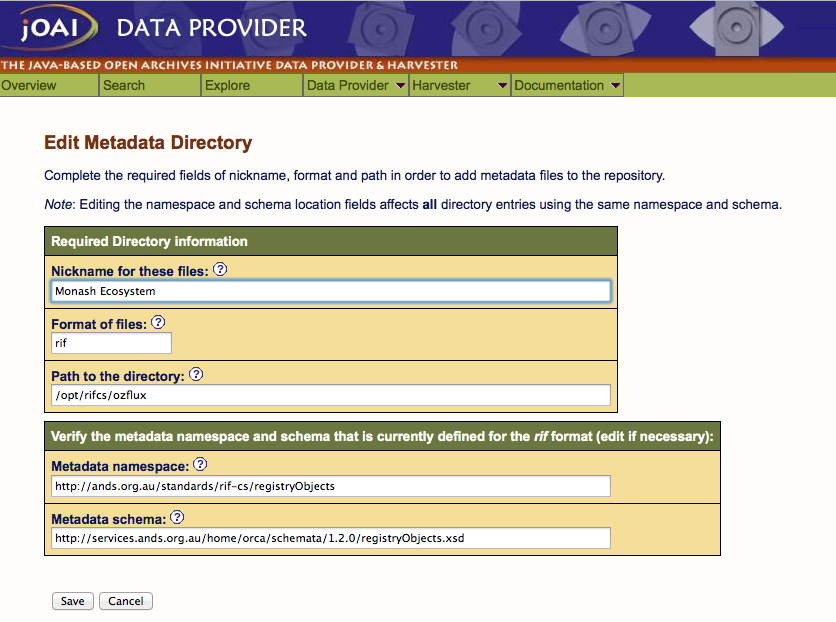
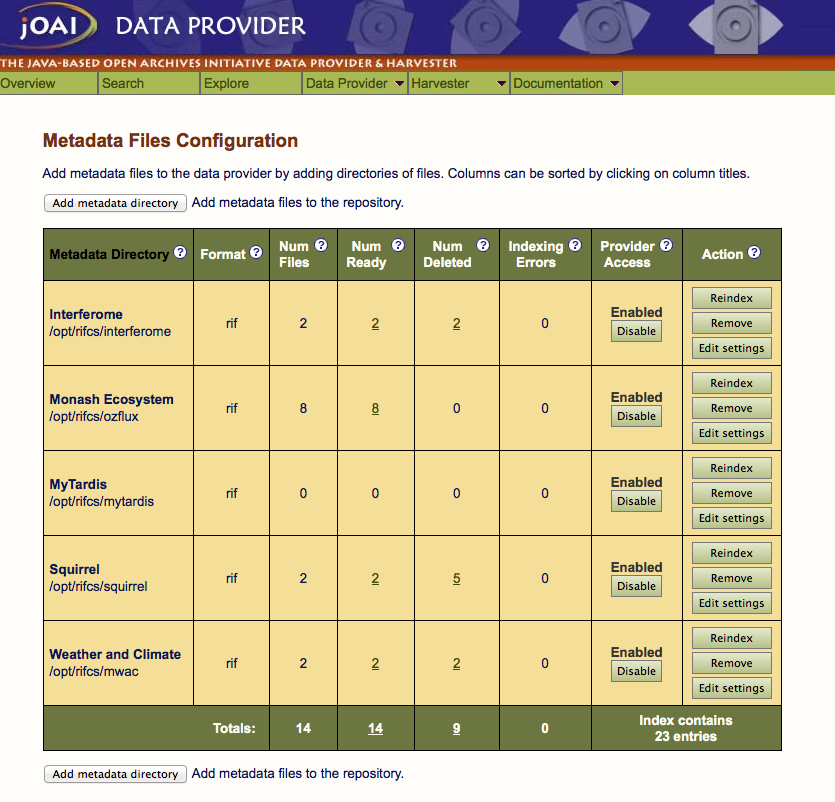
2. Complete the 'Metadata Files Configuration' in the Metadata Files Configuration page by adding one or more metadata directories to the repository. For each directory:
- Enter an appropriate nickname for the directory of files (required)
- Provide the metadata format (metadataPrefix) of the files (required)
- Enter the complete directory path to the metadata files (required)
- Enter the metadata namespace and schema for the format (optional but recommended)
The directory of files must contain XML files that conform to the rules described below under Preparing files for serving.
The metadata format may be any metadata (or data) format. In the OAI protocol, the format specifier is known as the metadataPrefix. The metadataPrefix may be any combination of URI unreservedcharacters , such as letters, numbers, underscores and dashes.
Examples:
| oai_dc | Dublin Core format |
| mods | Metadata Object Description Schema format |
| rif | Registry Interchange Format – Collections and Services format |
In general, the metadata namespace and schema can be found near the top of an XML file for the given format. If the format is recognized by the software these fields will be filled in automatically.

2.1. Configuration to support "RIF-CS"
Metadata namespace:
http://ands.org.au/standards/rif-cs/registryObjects
Metadata schema:
https://researchdata.edu.au/documentation/rifcs/schema/registryObjects.xsd

3. After completing step #2, the software automatically indexes the metadata files, which may take several minutes to complete. Once the files are indexed, the metadata is available for harvesting:
Identify:
https://researchdata.edu.au/registry/services/oai?verb=Identify
RIF-CS:
https://researchdata.edu.au/registry/services/oai?verb=ListRecords&metadataPrefix=rif
- You can also browse using the OAI protocol via the Explorer page and for textual searching using the Search or Admin search pages.
- The 'Metadata Files Configuration' shows information about the status of the files and indexing process.
- If metadata files are added, modified or deleted at a later time, the software automatically detects these changes and adds, deletes or re-indexes them every 8 hours.
- The index can also be updated manually at any time from the 'Files index administration' area.
